Hosting VS Code on AWS SageMaker Notebook Instance
Motivation
Amazon SageMaker is a fully managed machine learning service in AWS. In a typical ML workflow in AWS cloud, ML engineers and data scientist can leverage SageMaker Notebook Instances to write code for processing data, training as well as deploying models.
Visual Studio Code is a source code editor that features an extensive set of developer tooling and extensions, making it one of the most popular editors among programmers.
This post documents for myself (and perhaps others) the steps to setting up VS Code on SageMaker notebook instances.
Step 1: Installing Code-Server & Lifecycle Configuration
The first step is to create a Lifecycle Configuration script that runs each time an associated notebook instance is started, including during the initial creation.

The following shell script can be used to install code-server and integrate it with Jupyter, allowing us to run and access VS Code in the browser. The script can be updated to install the latest releases of code-server:
#!/bin/bash

echo ==INSTALLING CODE-SERVER==

# Get latest code-server release if needed
yum install -y https://github.com/coder/code-server/releases/download/v4.11.0/code-server-4.11.0-amd64.rpm
# Update keytar and jupyter-server-proxy
/home/ec2-user/anaconda3/envs/JupyterSystemEnv/bin/pip install -U keytar jupyter-server-proxy

echo ==UPDATING JUPYTER SERVER CONFIG==

######################################
# Integrate Code-server with jupyter #
######################################

# Append code to the end of 'jupyter_notebook_config.py' file
cat >>/home/ec2-user/.jupyter/jupyter_notebook_config.py <<EOC
c.ServerProxy.servers = {
  'vscode': {
      'launcher_entry': {
            'enabled': True,
            'title': 'VS Code',
      },
      'command': ['code-server', '--auth', 'none', '--disable-telemetry', '--bind-addr', '127.0.0.1:{port}'],
      'environment' : {'XDG_DATA_HOME' : '/home/ec2-user/SageMaker/vscode-config'},
      'absolute_url': False,
      'timeout': 30
  }
}
EOC

echo ==INSTALL SUCCESSFUL. RESTARTING JUPYTER==

# Restart jupyter server
systemctl restart jupyter-server
There are two options for running this script:
Start notebook: The script will be run each time an associated notebook instance is started, including during initial creation. If the associated notebook instance is already started, it will be run the next time it is stopped and started.
Create notebook: When selected during creation of a new notebook instance, the script will be run once during its initial creation. The script will not be run on existing notebook instances.

Step 2: Associate Lifecycle Configuration Script With An Notebook Instance
The next step would be to associate the Lifecycle Configuration script with a notebook instance. In the settings:
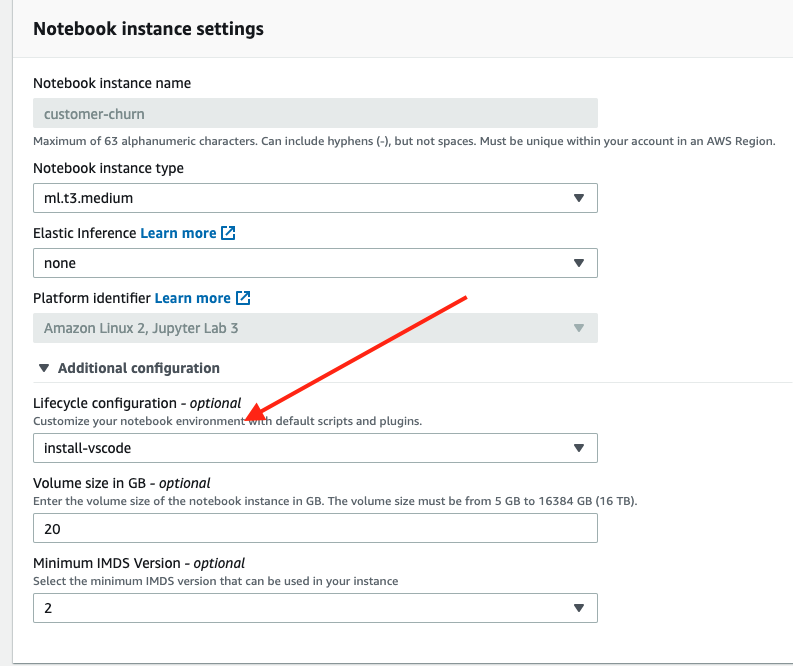
Upon launching the notebook instance, we should now see the option to open VS Code in the browser:

In the new tab:
