$ cd path_to_pem_fileLittle “p” Production
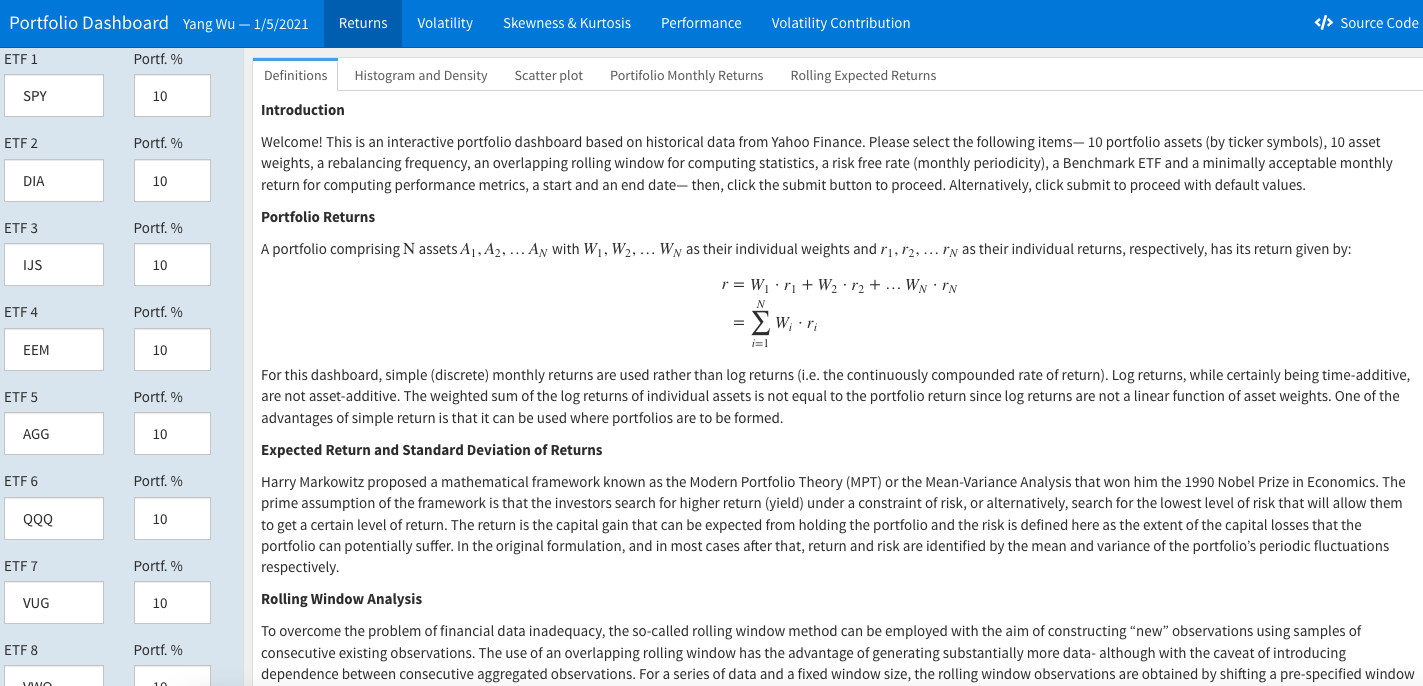
For R shiny applications or interactive documents such as flexdashboards, there are a few options for deployment and hosting, including shinyapp.io, rstudio connect, and both the open-source and paid version of shiny server.
ShinyProxy
Another powerful alternative is ShinyProxy, an open-source, enterprise-grade solution that leverages Docker and JVM technology for secure and scalable deployment. ShinyProxy is ideal for those requiring enterprise features, preferring open-source tools, and seeking the flexibility of container-based technology. For a detailed guide on deploying Shiny or Dash apps with ShinyProxy, Docker, and AWS, refer to the post, Deploying Python Dash and R Shiny Apps with ShinyProxy, Docker, Amazon EC2 and Cognito.
As Hadley Wickham highlighted in his 2024 New York R conference talk, R (and R Shiny applications) can indeed be deployed for production. However, he distinguished between upper case “P” Production, which typically involves advanced network setup, security measures, automated scaling, and lower case “p” production, which is more suited for simpler deployments intended for a small audience or personal use. In this context, if the goal is to share an internal analysis dashboard with a limited user base and without the need for extensive scalability, the added complexity and cost of a sophisticated deployment may be unnecessary.
This blog post documents the steps for deploying shiny applications or interactive documents with AWS in a relatively simple and cost-effective way.
First, a few resources to get familiar with AWS and EC2:
Step 1: Amazon EC2
If your organization already uses Amazon EC2, you may consult with your AWS account admin regarding the following:
Deploy a New EC2 Instance: Your admin can create an IAM entity with the necessary policies to deploy your Shiny applications or interactive documents on a new EC2 instance.
Reuse an Existing EC2 Instance: If you need to use an existing instance, you’ll connect via Secure Shell (SSH) using a Command Line Interface (CLI). For this, you’ll need the
.pemprivate key file.
The subsequent setup steps will vary depending on whether we are using our organization’s EC2 instance or setting up our own. For this guide, we will focus on creating a personal AWS account and launching an EC2 instance. Start by registering for an AWS account and creating an administrative user, which is free of charge.
Once we have the administrator user, we can deploy all resources via the AWS Management Console after logging in. Fine-grained permission sets can be configured as needed.
Credentials
A key pair is a secure way of connecting to your EC2 instance. When you create an EC2 instance, you can specify the name of the key pair you would like to use to connect to the instance. If you don’t already have a key pair, you can create one by following the documentation here.

From this point on until step 2, all resources can be provisioned using a CloudFormation template in a single step. The template is in the sub-section titled Deploy All Resources Using CloudFormation In A Single Step.
AMI
Select an Amazon machine image.
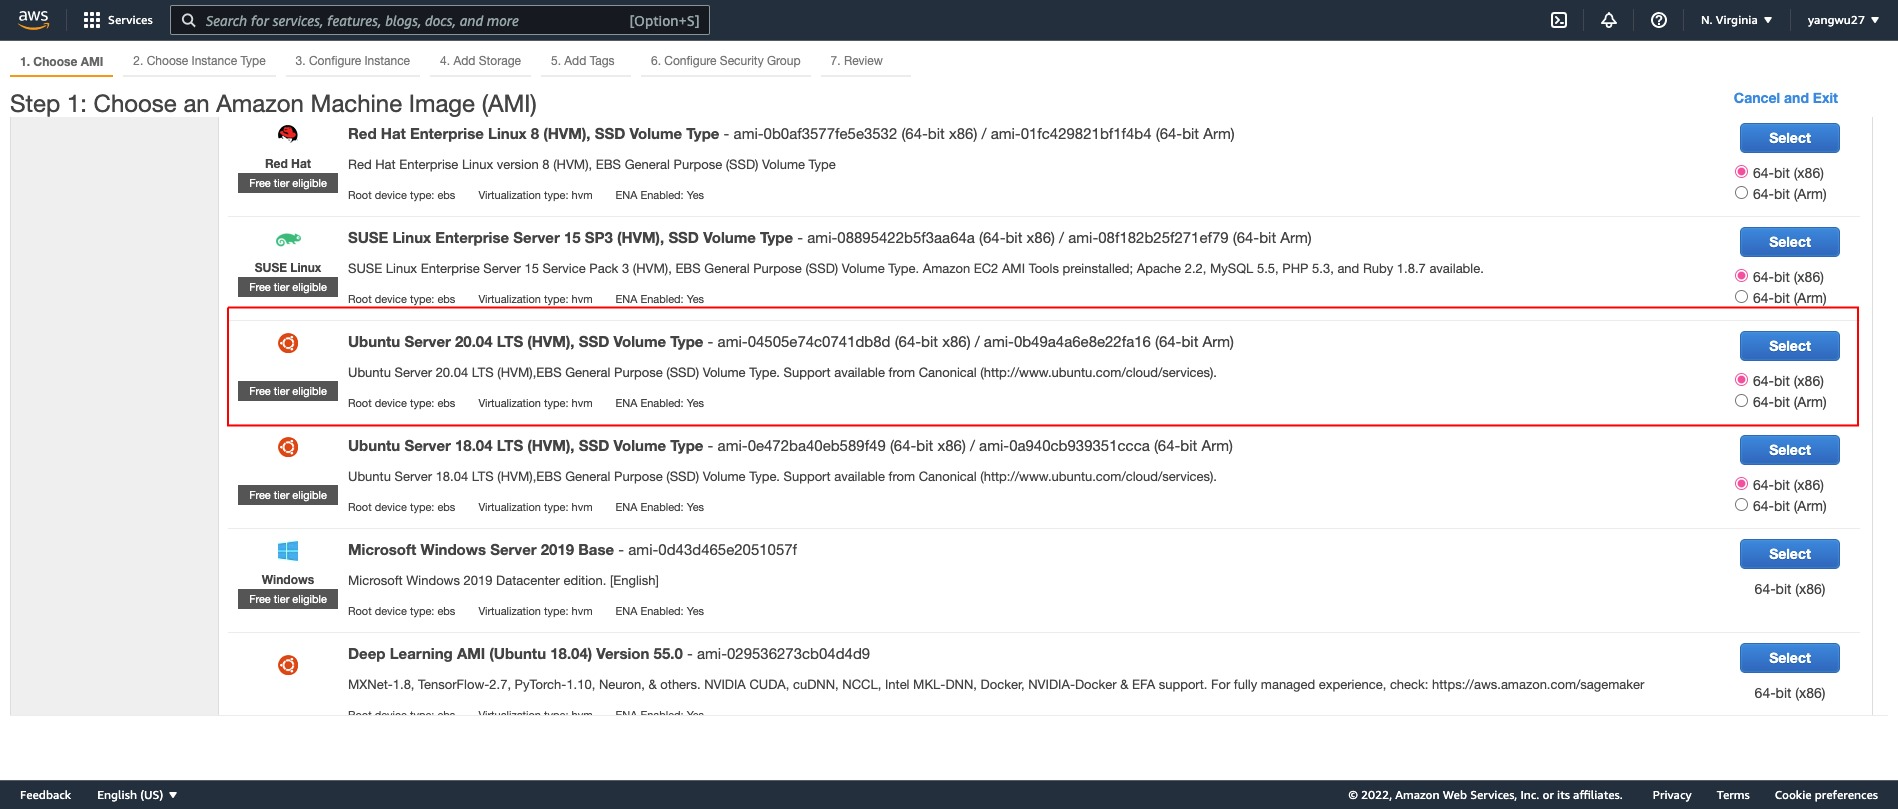
Why Ubuntu?
Because many tutorials and resources are available for Ubuntu, we’ll use the Ubuntu AMI. It offers a free tier and is well-documented, which can help avoid potential issues with system requirements. Ubuntu 20.04.1 LTS, as of the time of writing, is widely used and has extensive documentation, which could potentially make troubleshooting R related issues easier compared to other AMIs like Amazon Linux based on Red Hat Enterprise Linux (RHEL).
While you might not always have the choice of AMI in a enterprise setting, the steps provided should still work with other AMIs. However, be aware that different AMIs may require different builds of system libraries and packages, which could lead to installation issues and varying command syntax that may not be covered in this post.
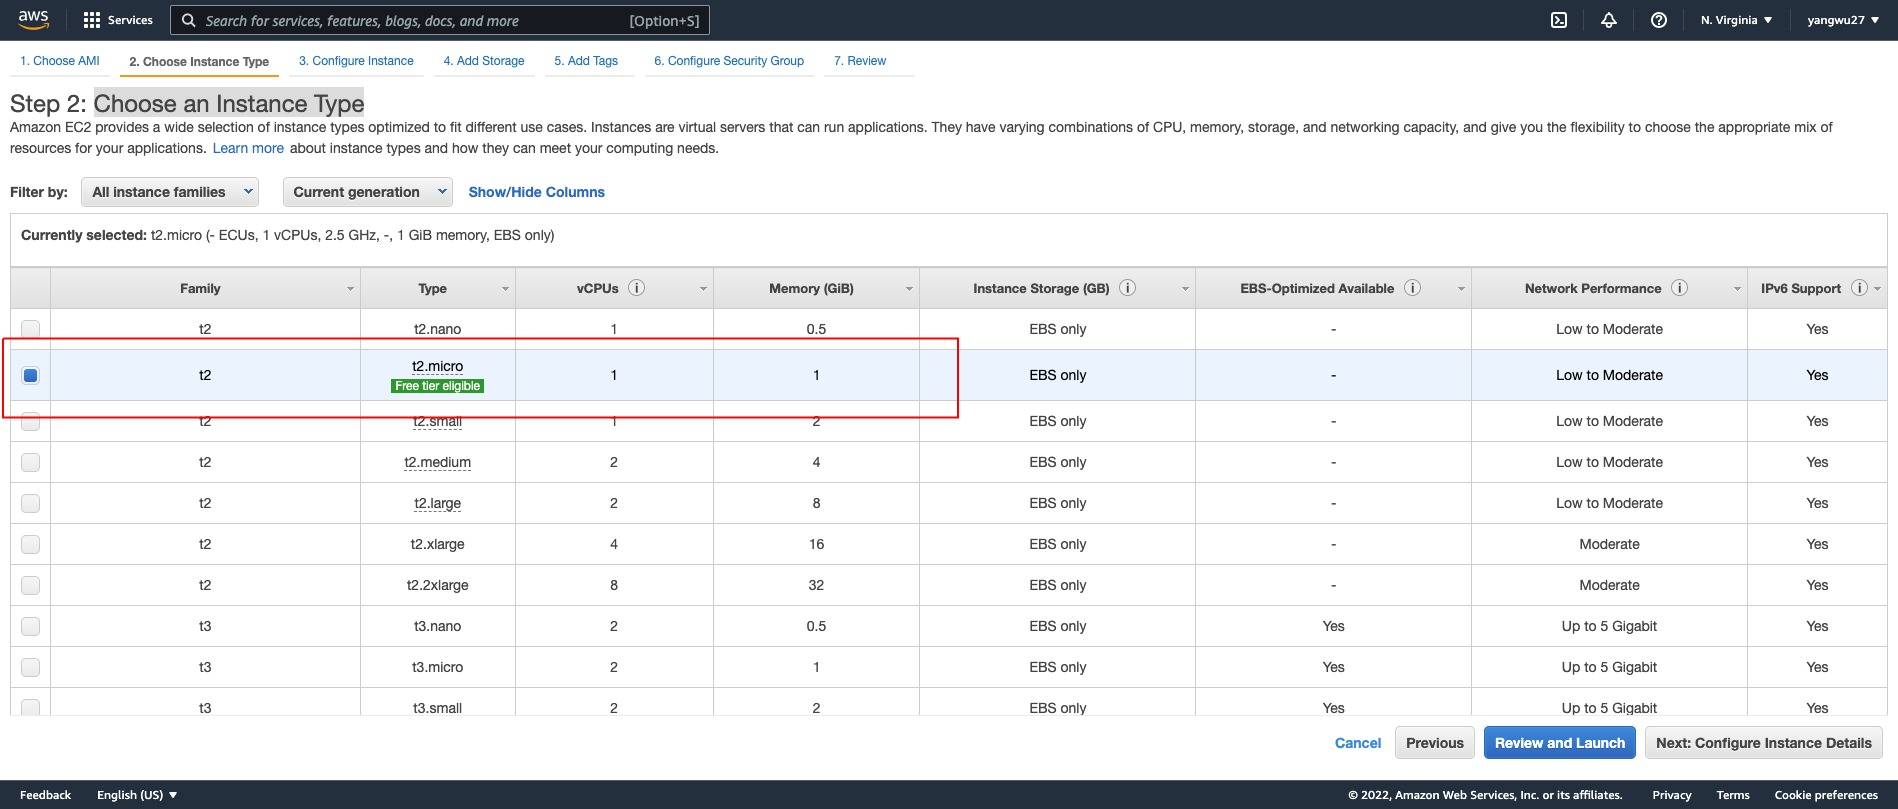
Instance Type
We will choose t2.micro, which is free tier eligible. Depending on your computing needs (e.g., installing R packages with compiled code), you might run out of memory and may need to consider other instance types. For a better understanding of instance type differences, the following article may be helpful.
If the installation of an R package ever hangs or takes an unusually long time, this may be signs that the instance type is not sufficient for the dependency installation. In such cases, you may need to upgrade to a larger instance type just for the installation and then downgrade back to the original instance type.
Key Pair
Select the key pair you created earlier.

EBS Volume
The default EBS volume size is 8 GiB but we get up to 30 GiB of General Purpose SSD via the free tier. See the documentation on EBS volume options.

VPC & Security Group
A Virtual Private Cloud (VPC) is a virtual network dedicated to your AWS account, isolated from other virtual networks in the AWS cloud. You can launch AWS resources, like EC2 instances, into your VPC.
By default, AWS creates a default VPC with subnets across all availability zone (AZ) in your region. For this post, we’ll create a new VPC and subnet. Specifically, we’ll set up a non-default VPC with a single public subnet in one availability zone with an internet gateway for internet access.
The VPC CIDR is 10.0.0.0/16, providing 65,536 IP addresses.
The public subnet CIDR is 10.0.0.0/24, providing 256 IP addresses.

If these terms are new to you, check out this YouTube series.
A VPC is essential for controlling access to EC2 instances. Security groups act as virtual firewalls, managing inbound and outbound traffic. For a simple setup, use the following inbound rules:
| Type | Protocol | Port Range | Source | Description |
|---|---|---|---|---|
| SSH | TCP | 22 | See below | SSH |
| HTTP | TCP | 80 | Anywhere: 0.0.0.0/0, ::0 | Use nginx to password protect and set up reverse proxy |
| HTTPS | TCP | 443 | Anywhere: 0.0.0.0/0 ::0 | Secured web traffic using SSL/TLS |
| Custom TCP | TCP | 3838 | Anywhere: 0.0.0.0/0, ::0 | Default Shiny server |
| Custom TCP | TCP | 8787 | Anywhere: 0.0.0.0/0, ::0 | Default R Studio server |
Since our instance is utilized as a web server, we use security rules to allow IP addresses to access our instance using HTTP, HTTPS, or Custom TCP so that external users can browse the content on our web server.
The first rule should permit inbound SSH access only from trusted IPs. It’s recommended to restrict this to specific IP addresses, such as a single IP (e.g.,
your-ip/32) or a range of IPs (e.g.,192.168.1.0/24).The second rule allows for inbound HTTP access from all IPv4 and IPv6 addresses.
The third rule allows for inbound HTTPS access from all IPv4 and IPv6 addresses.
The forth and fifth rules allow for inbound access to the default ports for Shiny Server and RStudio Server.
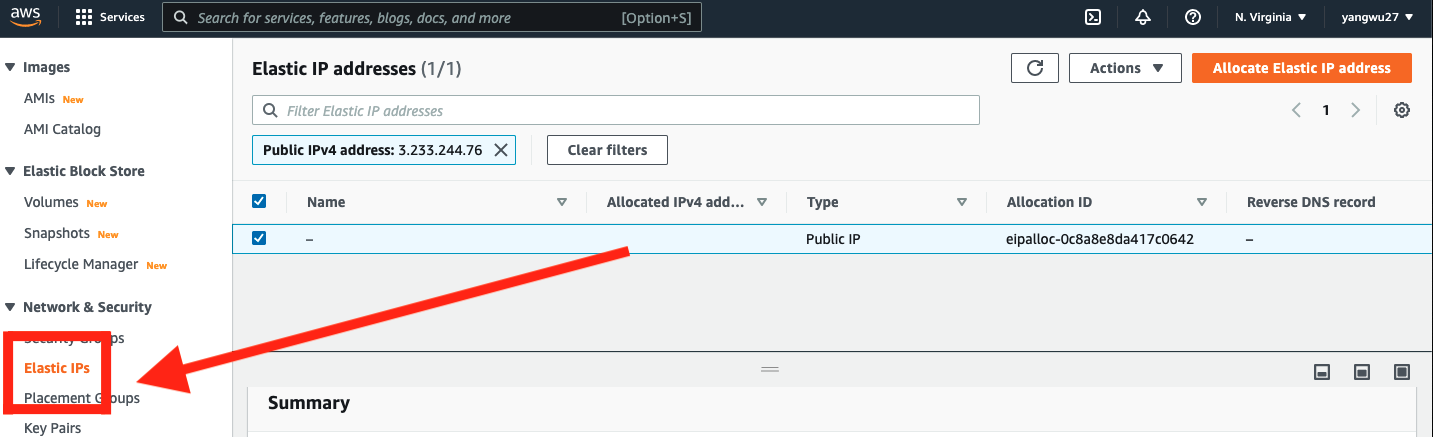
Optional: Elastic IP
An Elastic IP address differs from a regular Public IPv4 address. An Elastic IP address is allocated to your AWS account and remains yours until you release it, making it reusable across EC2 instances. This is particularly useful when upgrading or downgrading instance types. Without an Elastic IP, a new Public IPv4 address is assigned each time you stop and relaunch an instance, necessitating updates to any services dependent on the IP. With an Elastic IP, you can easily associate it with a new instance, allowing you to mask instance or software failures by rapidly remapping the address to another instance within your account. The setup is as follows:
Deploy All Resources Using CloudFormation In A Single Step
CloudFormation is a service that allows you to provision AWS resources using templates. It is a useful way to automate the deployment of resources and ensure consistency across your AWS environment. All previous steps except for the creating the key pair can be automated using CloudFormation in a single step.
Create a template yaml file with the following content:
AWSTemplateFormatVersion: '2010-09-09'
Description: CloudFormation template to create a VPC with a single subnet, custom security group, and an EC2 instance.

Parameters:
  WhiteListIP:
    Description: The IP address or range of IPs that will be allowed to SSH into the instance (e.g., IPV4/32)
    Type: String
    AllowedPattern: ^([0-9]{1,3}\.){3}[0-9]{1,3}(\/[0-9]{1,2})?$
    ConstraintDescription: Must be a valid IP CIDR range or a single IP address.

  ImageId:
    Description: The AMI ID to use for the EC2 instance, defaults to Ubuntu Server 24.04 LTS 64-bit (x86).
    Type: AWS::EC2::Image::Id
    Default: 'ami-0e86e20dae9224db8'

  DeviceName:
    Description: The device name for the EBS volume, defaults to /dev/sda1.
    Type: String
    Default: '/dev/sda1'
    ConstraintDescription: Must be a valid device name for the image used.

  InstanceType:
    Description: The EC2 instance type.
    Type: String
    Default: 't3.micro'
    AllowedValues:
      - t2.micro
      - t2.small
      - t2.medium
      - t2.large
      - t2.xlarge
      - t2.2xlarge
      - t3.micro
      - t3.small
      - t3.medium
      - t3.large
      - t3.xlarge
      - t3.2xlarge
    ConstraintDescription: Must be a valid EC2 instance type.

  KeyName:
    Description: The name of the EC2 Key Pair to allow SSH access to the instance.
    Type: AWS::EC2::KeyPair::KeyName
    ConstraintDescription: Must be the name of an existing EC2 Key Pair.

  VolumeSize:
    Description: The size of the EBS volume in GiB, defaults to 30 GiB.
    Type: Number
    Default: 30
    MinValue: 8
    MaxValue: 1024
    ConstraintDescription: Must be between 8 and 1024 GiB.

  DeleteOnTermination:
    Description: Whether to delete the EBS volume when the instance is terminated.
    Type: String
    Default: 'true'

  VpcCIDR:
    Description: Please enter the IP range (CIDR notation) for this VPC
    Type: String
    Default: 10.0.0.0/16

  PublicSubnetCIDR:
    Description: Please enter the IP range (CIDR notation) for the public subnet in the first Availability Zone
    Type: String
    Default: 10.0.0.0/24

  UseElasticIP:
    Description: Set to 'true' to allocate and associate an Elastic IP with the instance, defaults to 'false'.
    Type: String
    Default: 'false'
    AllowedValues:
      - 'true'
      - 'false'

Conditions:
  CreateElasticIP: !Equals [!Ref UseElasticIP, 'true']

Resources:
  VPC:
    Type: AWS::EC2::VPC
    Properties:
      CidrBlock: !Ref VpcCIDR
      EnableDnsSupport: true
      EnableDnsHostnames: true
      Tags:
        - Key: Name
          Value: !Sub ${AWS::StackName}-vpc

  InternetGateway:
    Type: AWS::EC2::InternetGateway
    Properties:
      Tags:
        - Key: Name
          Value: !Sub ${AWS::StackName}-igw

  VPCGatewayAttachment:
    Type: AWS::EC2::VPCGatewayAttachment
    Properties:
      VpcId: !Ref VPC
      InternetGatewayId: !Ref InternetGateway

  PublicRouteTable:
    Type: AWS::EC2::RouteTable
    Properties:
      VpcId: !Ref VPC
      Tags:
        - Key: Name
          Value: !Sub ${AWS::StackName}-rtb

  PublicRoute:
    Type: AWS::EC2::Route
    Properties:
      RouteTableId: !Ref PublicRouteTable
      DestinationCidrBlock: 0.0.0.0/0
      GatewayId: !Ref InternetGateway

  PublicSubnet:
    Type: AWS::EC2::Subnet
    Properties:
      VpcId: !Ref VPC
      CidrBlock: !Ref PublicSubnetCIDR
      MapPublicIpOnLaunch: true
      AvailabilityZone: !Select
        - 0
        - !GetAZs ''
      Tags:
        - Key: Name
          Value: !Sub ${AWS::StackName}-subnet

  PublicSubnetRouteTableAssociation:
    Type: AWS::EC2::SubnetRouteTableAssociation
    Properties:
      SubnetId: !Ref PublicSubnet
      RouteTableId: !Ref PublicRouteTable

  SecurityGroup:
    Type: AWS::EC2::SecurityGroup
    Properties:
      VpcId: !Ref VPC
      GroupDescription: Allow inbound traffic for Shiny Server, RStudio Server, HTTP, HTTPS, and SSH
      SecurityGroupIngress:
        - IpProtocol: tcp
          FromPort: 3838
          ToPort: 3838
          CidrIp: 0.0.0.0/0 # Shiny Server
        - IpProtocol: tcp
          FromPort: 8787
          ToPort: 8787
          CidrIp: 0.0.0.0/0 # RStudio Server
        - IpProtocol: tcp
          FromPort: 80
          ToPort: 80
          CidrIp: 0.0.0.0/0 # HTTP
        - IpProtocol: tcp
          FromPort: 443
          ToPort: 443
          CidrIp: 0.0.0.0/0 # HTTPS traffic
        - IpProtocol: tcp
          FromPort: 22
          ToPort: 22
          CidrIp: !Ref WhiteListIP # SSH access from the specified IP address or range
      Tags:
        - Key: Name
          Value: !Sub ${AWS::StackName}-sg

  EC2Instance:
    Type: AWS::EC2::Instance
    Properties:
      InstanceType: !Ref InstanceType
      KeyName: !Ref KeyName
      ImageId: !Ref ImageId
      SecurityGroupIds:
        - !Ref SecurityGroup
      SubnetId: !Ref PublicSubnet
      BlockDeviceMappings:
        - DeviceName: !Ref DeviceName
          Ebs:
            VolumeType: gp3
            VolumeSize: !Ref VolumeSize
            DeleteOnTermination: !Ref DeleteOnTermination
      Tags:
        - Key: Name
          Value: !Sub ${AWS::StackName}-instance
    DependsOn: VPCGatewayAttachment

  EIP:
    Condition: CreateElasticIP
    Type: AWS::EC2::EIP
    Properties:
      Domain: vpc
      InstanceId: !Ref EC2Instance
      Tags:
        - Key: Name
          Value: !Sub ${AWS::StackName}-eip
    DependsOn: EC2Instance
From the CloudFormation console of the admin user, upload the yaml file and create the stack:

Step 2: Connecting to Amazon EC2
SSH
Open the terminal, navigate to the path of our .pem key:
Next, run the following command to set the appropriate permissions on the private key, ensuring it is readable only by you (the owner):
$ chmod 400 file.pemConnect to the instance, replacing the placeholder Public IPv4 DNS with that of your instance, which can be found in the EC2 console EC2 -> Instance -> Instance ID:
$ ssh -i "file.pem" ubuntu@ec2-public-ip-address.compute-1.amazonaws.comIf this is your first time connecting to your EC2 instance, you may receive an Are you sure you want to continue connecting (yes/no/[fingerprint])? prompt. Entering yes should successfully connect you to your instance.
Welcome to Ubuntu 20.04.3 LTS (GNU/Linux 5.11.0-1022-aws x86_64)

 * Documentation:  https://help.ubuntu.com
 * Management:     https://landscape.canonical.com
 * Support:        https://ubuntu.com/advantage

  System information as of Sat Jan 29 01:27:58 UTC 2022

  System load:  0.0               Processes:             100
  Usage of /:   4.9% of 29.02GB   Users logged in:       0
  Memory usage: 21%               IPv4 address for eth0: 172.31.91.243
  Swap usage:   0%


1 update can be applied immediately.
To see these additional updates run: apt list --upgradable
To disconnect from our instance:
$ exitUpgrading and Installing System Packages
This step, and many that follow, are where your AMI, and hence your operating system choice will start to matter. The commands provided are intended for Ubuntu, a Debian-based Linux distribution. For example, Ubuntu uses the Advanced Package Tool (APT) for software installation and removal. In contrast, Red Hat-based distros use the Yellowdog Updater, Modified (YUM) for package management.
R packages often depend on external system libraries. On Ubuntu, for instance, before installing the curl R package, you must first install the necessary system library via apt-get install libcurl. Resolving these dependencies can be challenging and varies depending on your operating system. A practical approach to troubleshooting is to Google system dependencies as needed, especially after encountering errors during R package installation. Often, someone else has already faced—and solved—the same issue.
# Update commands
$ sudo apt update
$ sudo apt-get update -y
$ sudo apt-get dist-upgrade -y
# Install some system libraries
$ sudo apt-get -y install \
    nginx \
    gdebi-core \
    apache2-utils \
    pandoc \
    pandoc-citeproc \
    libssl-dev \
    libcurl4-gnutls-dev \
    libcairo2-dev \
    libgsl0-dev \
    libgdal-dev \
    libgeos-dev \
    libproj-dev \
    libxml2-dev \
    libxt-dev \
    libv8-dev \
    libhdf5-dev \
    git
The difference between apt-get and apt is that apt-get is an older command with more options, while apt is a newer, more user-friendly command with fewer options. Tools like explainshell.com (GitHub repo here) can be extremely helpful for understanding command-line syntax. Other useful resources include the FreeBSD Manual Pages.
These days, much of the R ecosystem interoperates with C++. To compile these R packages, you’ll also need to install the necessary compilation tools, such as the build-essential package on Ubuntu.
$ sudo apt install build-essentialOn Ubuntu, you may run the following command to check on disk space:
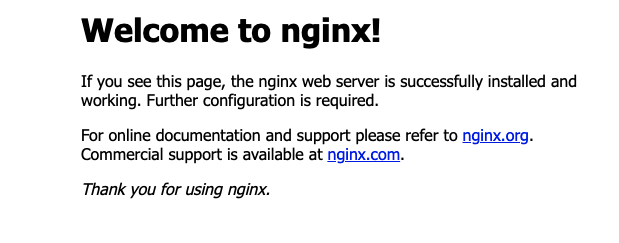
$ df -hIf nginx is installed successfully, you should see the following page by entering your Public IPv4 address (obtained from Instance summary in your AWS console) into your web browser:
Step 3: Installing R, Rstudio Server, and Shiny Server
Installing R from CRAN
Because R updates frequently, the latest stable version isn’t always available from Ubuntu’s default repositories, and so we’ll need to add the external repository maintained by CRAN. To install the latest version of R from CRAN, the commands are as follows:
# Update indices
$ sudo apt update -qq
# Install two helper packages
$ sudo apt install --no-install-recommends software-properties-common dirmngr
# Add the signing key (by Michael Rutter) for these repositories
# To verify key, run gpg --show-keys /etc/apt/trusted.gpg.d/cran_ubuntu_key.asc
# Fingerprint: 298A3A825C0D65DFD57CBB651716619E084DAB9
$ wget -qO- https://cloud.r-project.org/bin/linux/ubuntu/marutter_pubkey.asc | sudo tee -a /etc/apt/trusted.gpg.d/cran_ubuntu_key.asc
# Add the R 4.0 repo from CRAN -- adjust 'focal' to 'groovy' or 'bionic' as needed
$ sudo add-apt-repository "deb https://cloud.r-project.org/bin/linux/ubuntu $(lsb_release -cs)-cran40/"
The instructions for installing R on other operating systems or Linux distros can be found here under “Download and Install R”. Run the following command to install R:
# Install recommended packages
$ sudo apt install r-base
Or, install without considering recommended packages:
# Install without recommended packages
$ sudo apt install --no-install-recommends r-base
To check the R version:
$ R --versionR version 4.4.1 (2024-06-14) -- "Race for Your Life"
Copyright (C) 2024 The R Foundation for Statistical Computing
Platform: x86_64-pc-linux-gnu
R is free software and comes with ABSOLUTELY NO WARRANTY.
You are welcome to redistribute it under the terms of the
GNU General Public License versions 2 or 3.
For more information about these matters see
https://www.gnu.org/licenses/.Other useful commands are:
# Run R from the terminal
$ R
# Quit
$ q()
If you are using a different AMI, the stable version of R in the default repository might vary. For example, with Amazon Linux AMI, the latest version of R is 3.x as of this writing. Depending on the R packages you need to install, this version may or may not pose compatibility issues.
Installing Rstudio Server
To download the latest version of RStudio Server, visit the official download page and select your Linux platform. The official installation instructions are straightforward. To install RStudio Server on Ubuntu 20 (as of the time of writing), use the following commands:
$ sudo apt-get install gdebi-core
$ wget https://download2.rstudio.org/server/bionic/amd64/rstudio-server-2021.09.2-382-amd64.deb
$ sudo gdebi rstudio-server-2021.09.2-382-amd64.deb
Installing Shiny Server
Install the shiny R package and the latest version of Shiny Server. If the versions listed in the commands below are outdated, copy and paste the commands directly from the official download page.
# Install shiny, which may take a while to compile on tc2.micro
$ sudo su - -c "R -e \"install.packages('shiny', repos='https://cran.rstudio.com/')\""
# Install Shiny Server
$ sudo apt-get install gdebi-core
$ wget https://download3.rstudio.org/ubuntu-18.04/x86_64/shiny-server-1.5.22.1017-amd64.deb
$ sudo gdebi shiny-server-1.5.22.1017-amd64.deb
Checking Installation
$ sudo systemctl status shiny-server
$ sudo rstudio-server status
You should see that both Rstudio server and Shiny server are installed. On RedHat-based Linux distributions, you might use the following commands to check if both servers are properly installed:
# List installed packages
$ sudo yum list installed
# Use grep command to filter for specific package
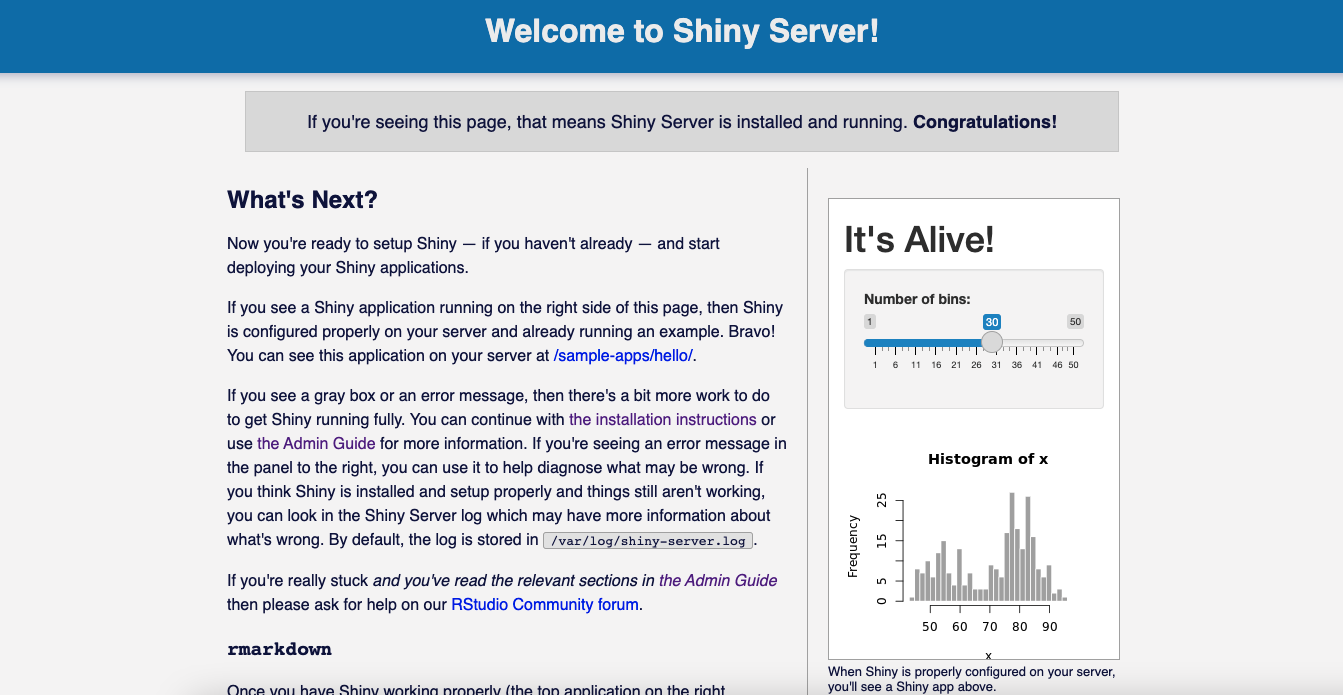
$ sudo yum list installed | grep nginxIf you enter http://<public-ipv4>:8787 and http://<public-ipv4>:3838 into your browser, you should see the following pages:
Rstudio Server
Shiny Server Index.html
Install R packages (System Library)
One way to install R packages is in a system-level or global library, making them available to all users and roles on our EC2 instance. To install R packages from CRAN via the terminal, use the following syntax:
$ sudo su - -c "R -e \"install.packages(c('tidyverse', 'data.table'), repos='http://cran.rstudio.com/')\""To install development versions of R packages from GitHub:
$ sudo su - -c "R -e \"install.packages('devtools', repos='http://cran.rstudio.com/')\""
$ sudo su - -c "R -e \"devtools::install_github('tidyverse/ggplot2')\""Note: As mentioned earlier, with the t2.micro instance type, you might run out of memory when installing certain R packages that require compilation (e.g., Rcpp and RcppArmadillo). If this happens, the installation process may appear to be stuck in a never-ending loop.
Install R packages (User Library)
Alternatively, you can install R packages (those not included with base R) in a user-level library, which can be advantageous for several reasons. We will revisit this option once we’ve set up the user credentials for RStudio Server.
Step 4: Rstudio Server and IDE
Create User
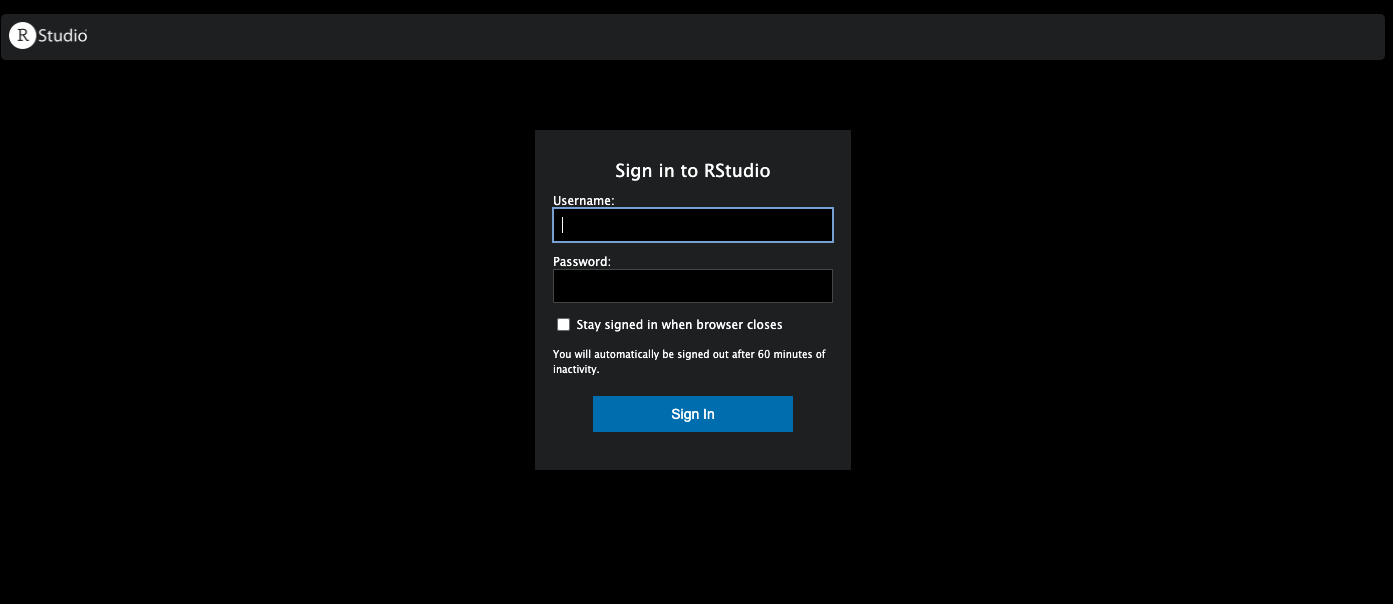
RStudio Server provides a browser-based interface (the RStudio IDE) to a version of R running on a remote Linux server. You can access the RStudio IDE by entering http://<public-ipv4>:8787 in your browser, assuming the proper inbound rules are set. The login credentials are based on the user information on your EC2 instance, stored in the /etc/passwd file. This file contains essential information about the system’s users.
In Ubuntu, there are two command-line tools for creating a new user account: useradd and adduser. The former is a low-level utility, while the latter, adduser, is a Perl script that provides a more user-friendly, interactive frontend for useradd:
$ sudo adduser MY-USERNAMEThe command above will prompt you to enter information to set up the user:
Adding user `MY-USERNAME' ...
Adding new group `MY-USERNAME' (1001) ...
Adding new user `MY-USERNAME' (1001) with group `MY-USERNAME' ...
Creating home directory `/home/MY-USERNAME' ...
Copying files from `/etc/skel' ...
New password:
Retype new password:
passwd: password updated successfully
Changing the user information for MY-USERNAME
Enter the new value, or press ENTER for the default
    Full Name []: Your Name
    Room Number []:
    Work Phone []:
    Home Phone []:
    Other []:
Is the information correct? [Y/n] y
This process creates the new user’s home directory and copies files from /etc/skel to it. Within this home directory, the user can create, edit, and delete files and directories. To allow this user to perform administrative tasks, add them to the sudo group using the usermod command:
$ sudo usermod -aG sudo MY-USERNAMEAlways use the -a (append) option when adding a user to a new group. Omitting the -a option will remove the user from any groups not listed after the -G option. On success, the usermod command does not display any output but will warn you if the user or group doesn’t exist.
To delete a user account in Ubuntu, you can use userdel or its interactive frontend deluser:
$ sudo deluser MY-USERNAMETo delete the user along with their home directory and mail spool, use the --remove-home flag:
$ sudo deluser --remove-home MY-USERNAMENote that you may need to kill an R session before removing the user:
# Kill an individual session
$ sudo rstudio-server kill-session <pid>
# Force kill all running sessions
$ sudo rstudio-server kill-all
You can obtain the session process ID with the following R function:
Sys.getpid()To change a user’s password:
$ sudo passwd MY-USERNAMETo remove a password and require a new password upon next login:
$ sudo passwd -d MY-USERNAMETo see a list of all users, use the following commands:
# List users
$ cut -d: -f1 /etc/passwd
# Search for a username using the grep command
$ grep MY-USERNAME /etc/passwd
# Or
$ grep -w '^MY-USERNAME' /etc/passwd
To view details about the /etc/passwd file:
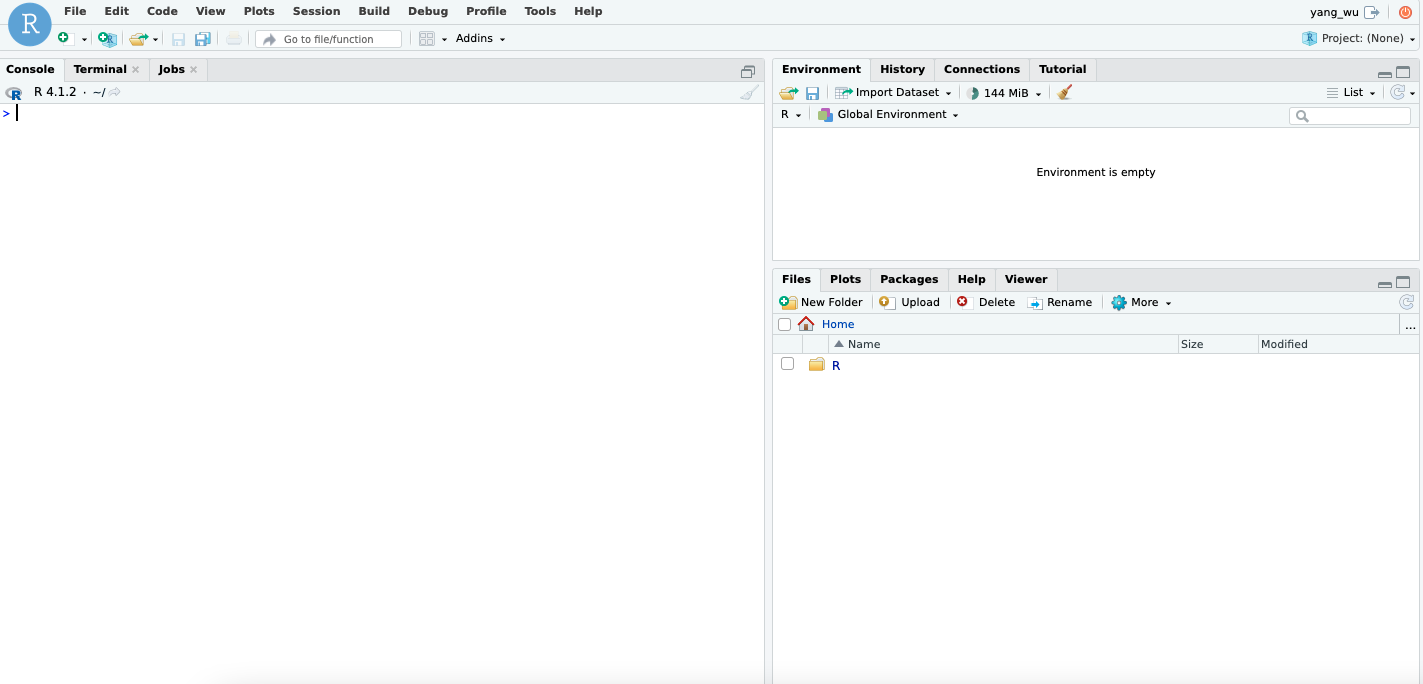
$ stat /etc/passwdFor more information, refer to the RStudio Server administration guide. Once logged into your RStudio IDE, you should see the following GUI:
Some useful commands for working with RStudio Server:
$ sudo rstudio-server stop
$ sudo rstudio-server start
$ sudo rstudio-server restart
User Library
Once you have set up a user on your EC2 instance, a home directory for that user is automatically created, along with a user-level R library. There is nothing extra you need to do for this setup. To confirm the setup, log in to your RStudio IDE and run the following function:
.libPaths()This command will return the library paths on your system. For example, on Ubuntu, you might see:
[1] "/home/MY-USERNAME/R/x86_64-pc-linux-gnu-library/4.1"
[2] "/usr/local/lib/R/site-library"
[3] "/usr/lib/R/site-library"
[4] "/usr/lib/R/library"
On Red Hat-based systems (such as Amazon Linux AMI 1), the output may look like this:
[1] "/home/MY-USERNAME/R/x86_64-redhat-linux-gnu-library/3.4"
[2] "/usr/lib64/R/library"
[3] "/usr/share/R/library"
The first path is always your user library, which means that running install.packages() in the RStudio IDE will install packages to this directory. On Debian and Ubuntu systems, the R_LIBS_USER environment variable is configured in the /etc/R/Renviron file as follows:
R_LIBS_USER=${R_LIBS_USER-'~/R/$platform-library/R-version'}Here, $platform represents a string like x86_64-pc-linux-gnu-library, which varies based on the architecture and R version installed on your EC2 instance. Additionally, the R_LIBS_SITE environment variable is also set in /etc/R/Renviron:
R_LIBS_SITE=${R_LIBS_SITE-'/usr/local/lib/R/site-library:/usr/lib/R/site-library:/usr/lib/R/library'}These environment variables define where R looks for packages. The R_LIBS_USER variable specifies the user-level library path, while R_LIBS_SITE covers system-wide paths where R packages are installed.
To view or edit these environment variables, you can open the /etc/R/Renviron file using:
$ sudo nano /etc/R/RenvironOn Ubuntu, the R packages that come with r-base and r-recommended are installed in /usr/lib/R/library. Additional R packages available as precompiled Debian packages (e.g., r-cran-* and r-bioc-*) are installed in /usr/lib/R/site-library. For more details on Debian packages for R, refer to this article.
For other operating systems, the location of these startup files may differ. However, you can also edit the configuration files directly within the RStudio IDE:
# Install usethis
install.packages("usethis")
# Open configuration files
usethis::edit_r_environ()
This allows you to customize your R environment easily, even from within the IDE.
Step 5: Shiny Server
The administrator’s guide is the best resource on Shiny Server, covering everything from system requirements to server management, hosting models, and security.
Configuration
Important: Before making any changes, first stop the Shiny Server:
# Ubuntu
$ sudo systemctl stop shiny-server
# Red Hat
$ sudo stop shiny-server
Here are some additional useful commands:
# Ubuntu
$ sudo systemctl start shiny-server
$ sudo systemctl status shiny-server
$ sudo systemctl restart shiny-server
# Red Hat
$ sudo start shiny-server
$ sudo status shiny-server
$ sudo restart shiny-server
To configure Shiny Server, you need to modify the default configuration file located at /etc/shiny-server/shiny-server.conf. You can edit this file using the GNU nano text editor:
$ sudo nano /etc/shiny-server/shiny-server.confThe default configuration file looks like this:
# Instruct Shiny Server to run applications as the user "shiny"
run_as shiny;

# Define a server that listens on port 3838
server {
  listen 3838;

  # Define a location at the base URL
  location / {

    # Host the directory of Shiny Apps stored in this directory
    site_dir /srv/shiny-server;

    # Log all Shiny output to files in this directory
    log_dir /var/log/shiny-server;

    # When a user visits the base URL rather than a particular application,
    # an index of the applications available in this directory will be shown.
    directory_index on;
  }
}
This configuration assumes that your shiny applications are located in /srv/shiny-server/. For other hosting models, refer to the Hosting Model section of the administrator’s guide. By default, Shiny Server listens on port 3838, making the example application available at http://public-ipv4:3838/sample-apps/hello/.
You can customize the configuration further by adding the following directives (a full list of supported directives is available in the Configuration Settings section of the administrator’s guide):
# Define a server that listens on port 3838
server {
  listen 3838;

  # Define a location at the base URL
  location / {
    # Set the user the app should run as
    run_as YOUR-USER-NAME;

    # Report errors to the client
    sanitize_errors off;

    # Host the directory of Shiny Apps stored in this directory
    site_dir /srv/shiny-server/;

    # Log all Shiny output to files in this directory
    log_dir /var/log/shiny-server/;

    # Disable the directory index page when visiting the base URL
    directory_index off;
  }
}run_as: Specifies the user under which the Shiny applications should run. This is important because R’s package paths (.libPaths()) are user-dependent. If the required packages are installed in a user-level library, the application must run under that user’s account. Therun_asdirective can be configured globally or for specific servers or locations.sanitize_errors off: This option allows error messages to be sent to the client, which can be helpful during development. Alternatively, you can check the log files located in/var/log/shiny-server/using the less command:
$ cd /var/log/shiny-server
$ ls -l
$ sudo less [LISTED-LOG-FILE].log
directory_index off: This setting disables the directory index page, so when a user visits the base URL (http://<public-ipv4>:3838), they will not see a list of available applications. This is useful for preventing users from browsing your Shiny apps directory.
By configuring these settings, you can better control how your Shiny Server behaves and ensure it meets your specific needs.
Reverse Proxy
A reverse proxy is an application that sits between clients and backend servers, forwarding client requests to those servers.
An analogy that might help is to think of the server as a house with many doors, each corresponding to a port. To access information within the house (the server), you need to go through the correct door (port) that leads to the appropriate information provider, such as a specific application or service.
Shiny Server, for instance, listens on port 3838. To reach Shiny Server, you must specify this port in the URL you enter into your browser—http://<public-ipv4>:3838. If you omit the port number or enter it incorrectly, the server will not know where to direct your request. A reverse proxy acts like a doorman at the main entrance of the house, directing you to the correct information provider without requiring you to know which door (port) to use. It routes client requests to the appropriate backend server.
With a reverse proxy in place, you can simply type http://<public-ipv4> or http://<public-ipv4>/* (where * represents any subpath) into your browser. The reverse proxy will know how to fetch the correct information from the appropriate server, without needing you to specify the port number. This configuration allows you to access your Shiny applications without having to manually enter port numbers in the URL. For this task, we will use nginx to set up the reverse proxy, which should already be installed on your EC2 instance in step 2 Upgrading and Installing System Packages.
Configure Nginx as a Reverse Proxy
First, stop the nginx service:
$ sudo service nginx stop
# Other useful commands
$ sudo service nginx start
$ sudo service nginx status
Next, navigate to the directory where nginx is installed:
$ cd /etc/nginx
$ ls -l
The output of ls may vary depending on the AMI (and the operating system) you are using. On Ubuntu, for example, nginx might create sites-available and sites-enabled directories by default. On RedHat/CentOS/Fedora, these directories might not exist, and the default location for configuration files is /etc/nginx/conf.d/*.conf. In the /etc/nginx/nginx.conf file, ensure that the following directive is included in the http block to instruct nginx to load any .conf files from the conf.d directory:
$ sudo nano /etc/nginx/nginx.confhttp {
...
##
# Virtual Host Configs
##
# Ensure that this directive is included
include /etc/nginx/conf.d/*.conf;
include /etc/nginx/sites-enabled/*;
}In the /etc/nginx directory, you should see at least the following subdirectories (if they don’t exist, you can create them):
$ conf.d sites-enabled nginx.conf sites-availableRemove the default configuration files from the sites-available and sites-enabled directories:
$ cd /etc/nginx/sites-enabled
$ sudo rm default
$ cd /etc/nginx/sites-available
$ sudo rm default
Create a new configuration file for Shiny Server:
$ cd /etc/nginx/sites-available
$ sudo nano shiny.conf
In the shiny.conf file, add the following configuration:
server {
   # Listen on port 80
   listen 80;
   # Listen on IPv6 addresses
   listen [::]:80;
   # Reverse proxy configuration
   location / {
       proxy_pass http://127.0.0.1:3838/;
       proxy_redirect http://127.0.0.1:3838/ $scheme://$host/;
       proxy_http_version 1.1;
       proxy_set_header Upgrade $http_upgrade;
       proxy_set_header Connection $connection_upgrade;
       proxy_read_timeout 120s;
       proxy_buffering on;
   }
}
Here’s a breakdown of the directives used:
proxy_pass: This directive forwards all requests matching the location block (/) to the backend server athttp://127.0.0.1:3838/. For more details, see the nginx documentation.proxy_redirect: This directive rewrites the URL in the response, replacinghttp://127.0.0.1:3838/with$scheme://$host/(e.g.,http://<public-ipv4>). This ensures that URLs in the response are correctly formatted for the client. Learn more aboutproxy_redirecthere.proxy_http_version: Sets the HTTP protocol version to use when proxying. By default, version 1.0 is used, but we set it to 1.1 to support WebSockets. More details here.proxy_set_header: These directives are necessary for WebSocket proxying. They ensure that the necessary headers are passed to the backend server to indicate a protocol upgrade request. Learn more about WebSocket proxying here.proxy_read_timeout: By default, the connection is closed if the backend server doesn’t send data within 60 seconds. This directive extends the timeout to 120 seconds. Details on time units innginxcan be found here.proxy_buffering on: Enables response buffering, allowingnginxto efficiently handle and transmit data by storing it in memory before sending it to the client, which improves performance. This is typically the case for shiny applications. More on performance tuning withnginxcan be found here.
Create a symbolic link in the sites-enabled directory to activate the configuration:
$ cd /etc/nginx/sites-enabled
# Use the absolute path to create the symbolic link
$ sudo ln -s /etc/nginx/sites-available/shiny.conf /etc/nginx/sites-enabled/
# To remove a symbolic link
$ sudo rm shiny.conf
The sites-enabled directory is where nginx looks for active configuration files. By creating a symbolic link, you can easily enable or disable a site without modifying the actual configuration file in sites-available.
Modify the nginx.conf file to support WebSockets by adding (copying and pasting) the following block within the http block. Ensure that indentation is correct and that the http block is properly closed:
$ sudo nano /etc/nginx/nginx.confhttp {
map $http_upgrade $connection_upgrade {
default upgrade;
'' close;
}
...
##
# Virtual Host Configs
##
# Ensure that this directive is included
include /etc/nginx/conf.d/*.conf;
include /etc/nginx/sites-enabled/*;
}Test the configuration to ensure it is correct:
$ sudo nginx -tIf successful, you should see:
nginx: the configuration file /etc/nginx/nginx.conf syntax is ok
nginx: configuration file /etc/nginx/nginx.conf test is successful
Restart nginx to apply the changes:
$ sudo service nginx startThis setup will allow you to access your shiny applications through http://<public-ipv4> without needing to specify a port number.
Step 6: Deployment
Remove Example Shiny Files
Before deploying your Shiny application or interactive documents, remove the default index.html and sample-apps from the Shiny Server site directory:
# Set file permissions to read/write
$ sudo chmod 777 /srv/shiny-server/
$ sudo rm /srv/shiny-server/index.html
$ sudo rm -rf /srv/shiny-server/sample-apps
Deploy An Example Application
By default, logging into the RStudio IDE on our EC2 instance using the user name and password created in step 4, section Create User, will place us in the user’s home directory, e.g., /home/MY-USERNAME. Using the Rstudio IDE, create a new project:

Add a simple application file app.R. This example is taken from the Shiny gallery:
library(shiny)

server <- function(input, output, session) {
  # Combine the selected variables into a new data frame
  selectedData <- reactive({
    iris[, c(input$xcol, input$ycol)]
  })

  clusters <- reactive({
    kmeans(selectedData(), input$clusters)
  })

  output$plot1 <- renderPlot({
    palette(c(
      "#E41A1C", "#377EB8", "#4DAF4A", "#984EA3",
      "#FF7F00", "#FFFF33", "#A65628", "#F781BF", "#999999"
    ))

    par(mar = c(5.1, 4.1, 0, 1))
    plot(selectedData(),
      col = clusters()$cluster,
      pch = 20, cex = 3
    )
    points(clusters()$centers, pch = 4, cex = 4, lwd = 4)
  })
}


vars <- setdiff(names(iris), "Species")

ui <- pageWithSidebar(
  headerPanel("Iris k-means clustering"),
  sidebarPanel(
    selectInput("xcol", "X Variable", vars),
    selectInput("ycol", "Y Variable", vars, selected = vars[[2]]),
    numericInput("clusters", "Cluster count", 3, min = 1, max = 9)
  ),
  mainPanel(
    plotOutput("plot1")
  )
)

shinyApp(ui = ui, server = server)
From within the RStudio IDE, copy the source file to the /srv/shiny-server/ directory:
# Create a new subdirectory
dir.create(path = "/srv/shiny-server/kmeans")
# Copy the source file into the created directory
file.copy("app.R", "/srv/shiny-server/kmeans/app.R")
[1] TRUE
If you encounter an error stating that the file does not exist, ensure the file path is correct. If you followed the steps above, your working directory should be the project directory on your EC2 instance.
Some other useful commands:
# Remove files
file.remove("/srv/shiny-server/kmeans/app.R")
# List files in a directory
list.files(path = "/srv/shiny-server/kmeans")
Or, if you prefer using the terminal to delete any files or directories:
# Remove directories within /srv/shiny-server/
$ sudo rm -rf /srv/shiny-server/my_app
Example Directory Structure
We are deploying using a simple hosting model that uses site_dir, which hosts the entire directory tree at /srv/shiny-server. The directory name can be anything syntactically valid.
For example, the /srv/shiny-server directory structure might look like this:
.
/srv/shiny-server/
├── my_app/
│   ├── app.R
├── another_app/
│   ├── ui.R
│   └── server.R
├── yet_another_app/
│   ├── flexdashboard.Rmd
└── ...Note: it is important to not name the entrypoint scripts the same as the application directories. For example, if you have a directory named my_app, the entrypoint script should not be named my_app.R. Instead, use a different name, such as app.R.
Example Application
In the browser, navigate to http://<public-ipv4>/kmeans (if you created a subdirectory within /srv/shiny-server/) or http://<public-ipv4> (if you copied the source files directly to /srv/shiny-server/). Your application or interactive documents should now be accessible:

Deploy Your Own Shiny Application
GitHub
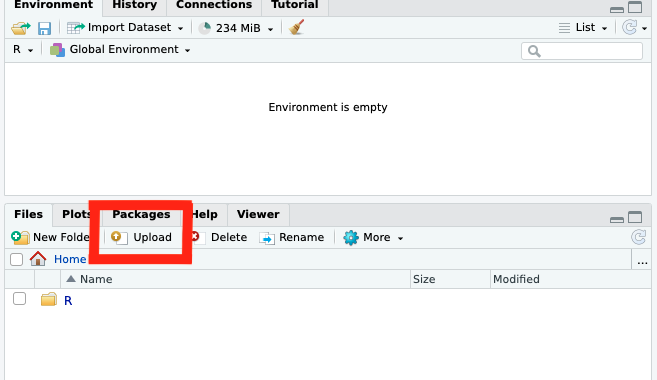
You can version control and upload the source files of your Shiny application directly to your EC2 instance using the upload button in the file pane of the RStudio server IDE:
Alternatively, version control and push the application source to a remote repository on GitHub and then clone the repository within the RStudio IDE on your EC2 instance. This approach offers the benefit of version control, making it easier to track changes to your source files over time. Some additional resources on Git and GitHub:
Git
R & Git
Assuming you now have a GitHub repository containing all your source files and dependencies, configure your Git user.name and user.email in the RStudio terminal on the EC2 instance:
git config --global user.name 'USERNAME'
git config --global user.email 'EMAIL@example.com'
To configure credentials to interact with remote repositories hosted on Github, there are two options:
HTTPS: To communicate with the remote server over HTTPS, set up a personal access token (PAT).
SSH: To communicate with the remote server over SSH, set up an SSH key.
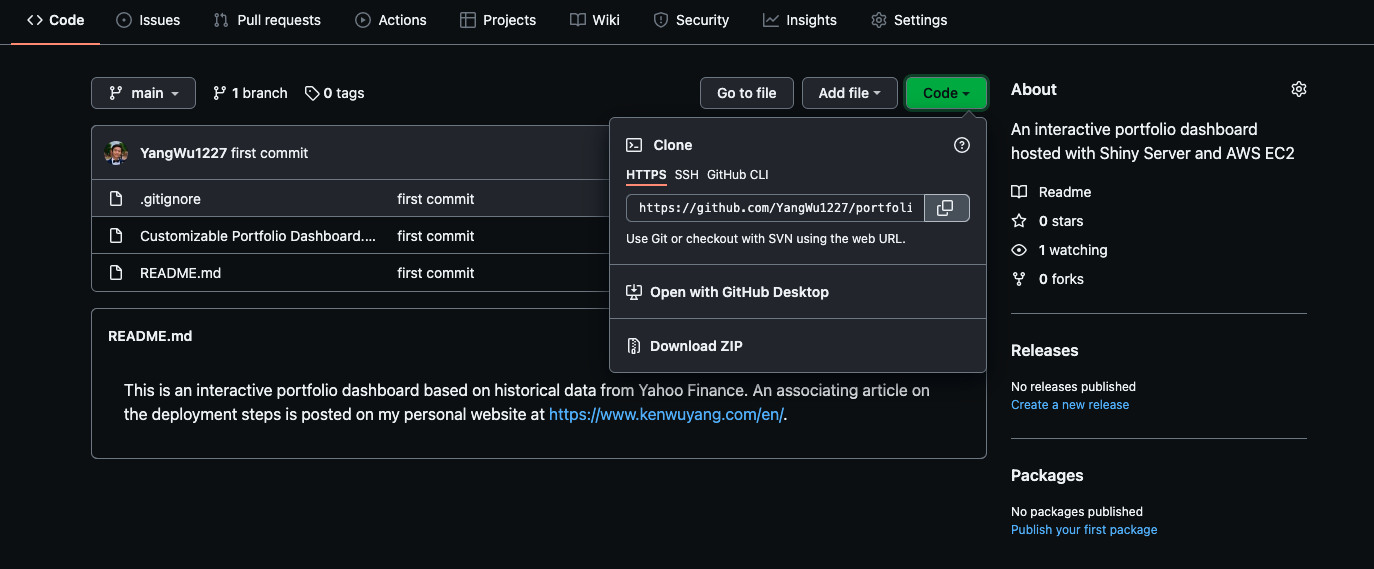
Once configured, follow these steps to clone the remote repository within the RStudio IDE on your EC2 instance. In your repository on GitHub, click the Code (green) button and copy the HTTPS or SSH URL:
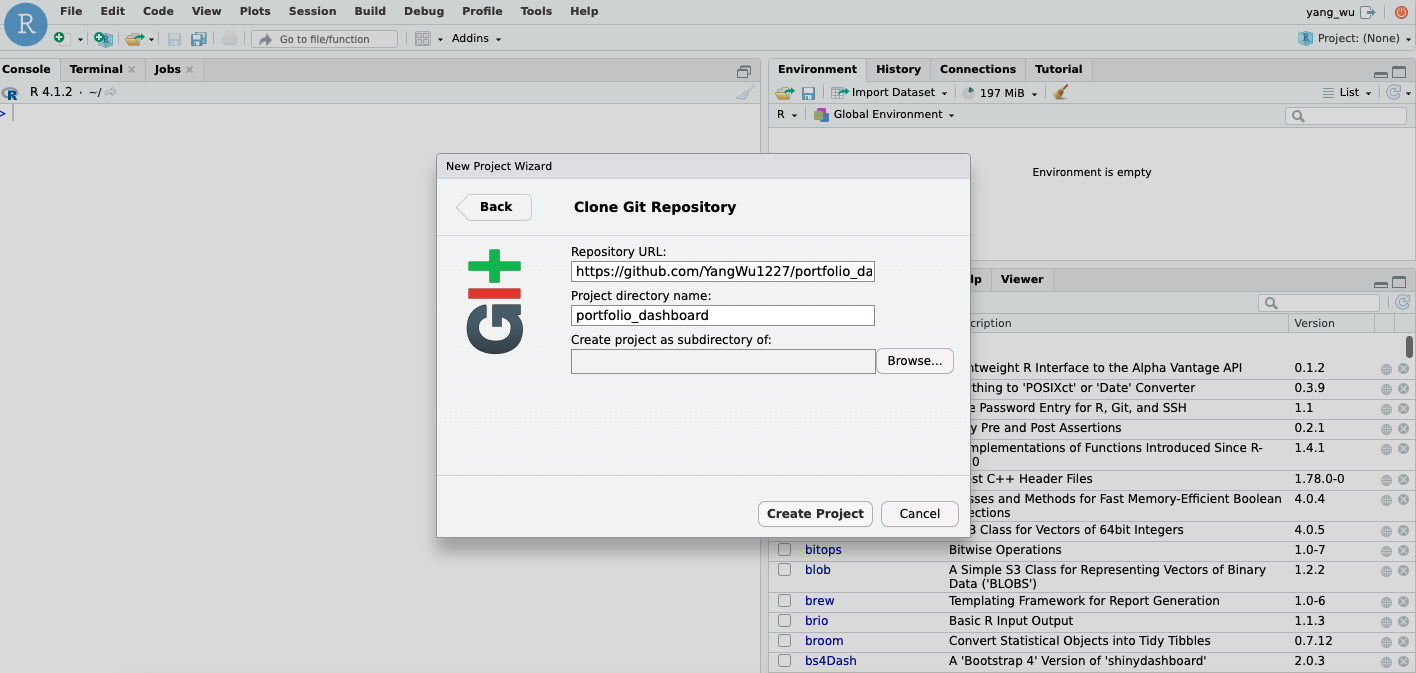
Create a new project in your RStudio IDE on your EC2 instance. Select Version Control.
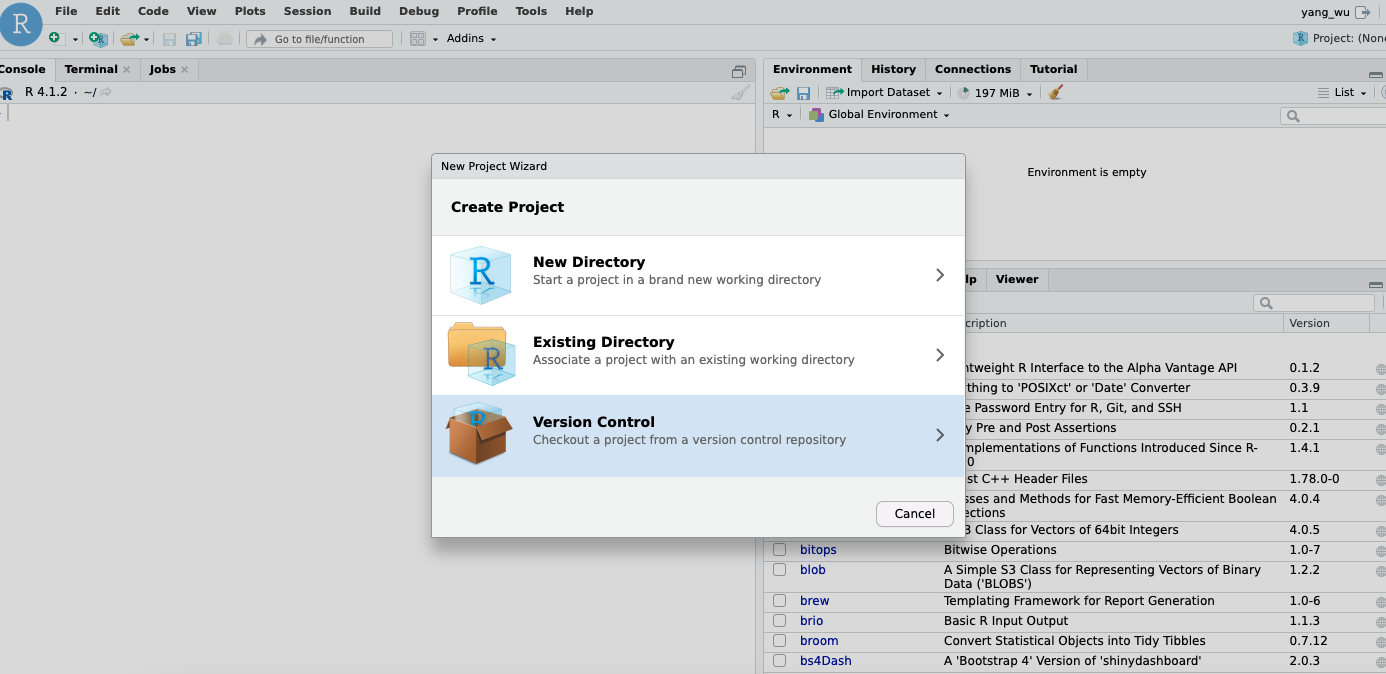
Choose “Clone a project from a Git repository,” then enter your URL and repository name.
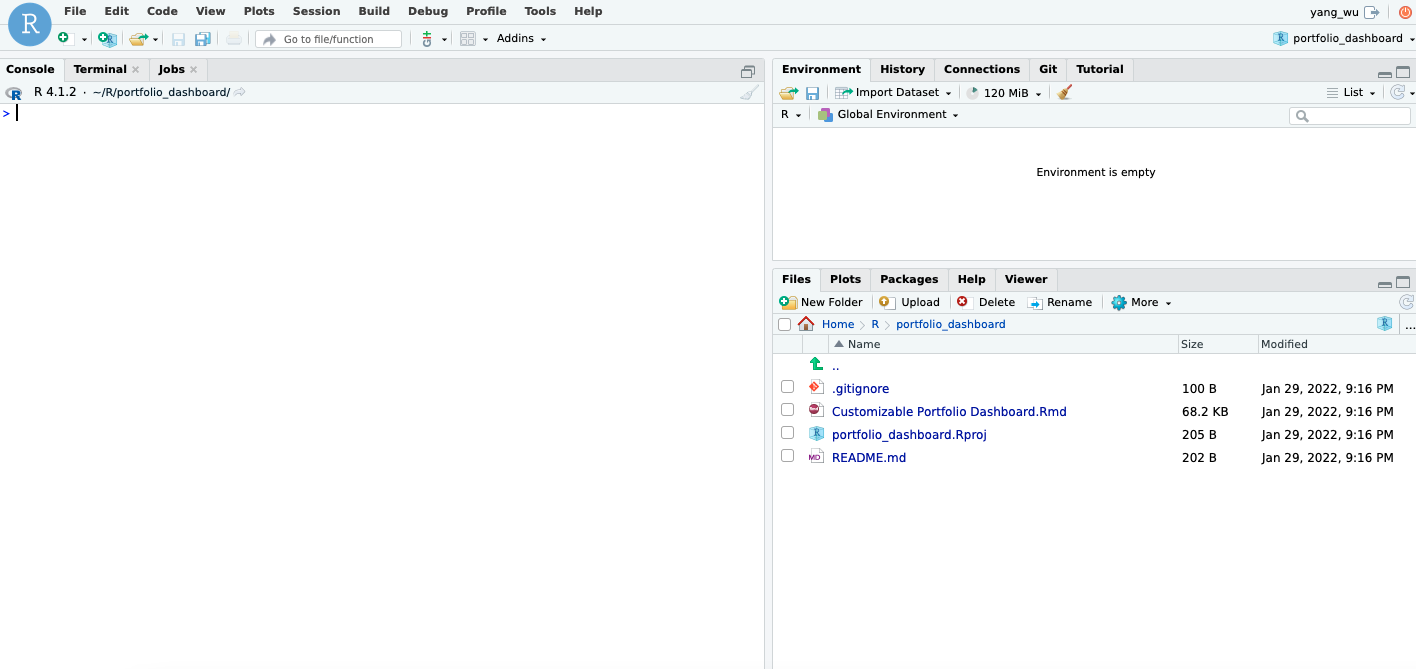
After creating the project, your source files should appear in the file pane of the IDE:
Once all source files are copied to the /srv/shiny-server/ directory, you can access your application by navigating to http://<public-ipv4> in your browser.
Step 7 (Recommended): Domain Name
Google Domain
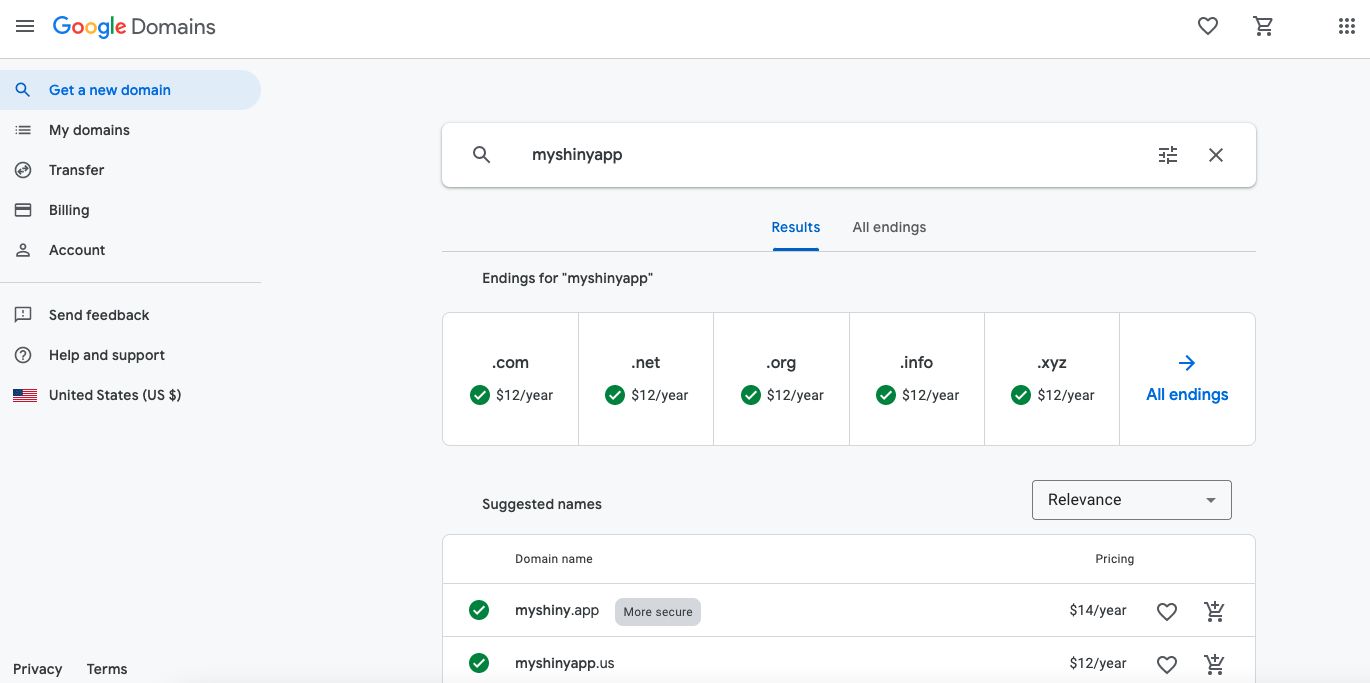
A domain name is simply the name of a website. Examples include google.com, wikipedia.org, and youtube.com. If you prefer to use a domain name rather than the raw IPv4 or elastic IP address of your EC2 instance—perhaps due to security concerns about exposing the IP address—you’ll need to purchase a domain name. If you’re fortunate, your organization may already own a domain. For this guide, however, we will purchase a new domain name.
While free domain options might seem tempting, remember the old adage:
There’s no such thing as a free lunch.
And when it comes to domain names, it’s often wise to heed this advice:
Customers should choose trusted providers over simply looking for the cheapest option.
Fortunately, there are many reputable domain registrars offering domains at reasonable prices. You can check Forbes’ list of the best domain registrars for 2021. In this guide, we’ll use Google Domains, which I personally use for my website, but the setup process is similar across most registrars.
Navigate to Google Domains and entering your desired domain name in the search box:

Consider choosing a domain that isn’t too popular, as more well-known domains are likely already taken. Select your domain name and proceed to checkout. Note that you’ll need a Google account to purchase a domain. Signing up for a Google account is free.
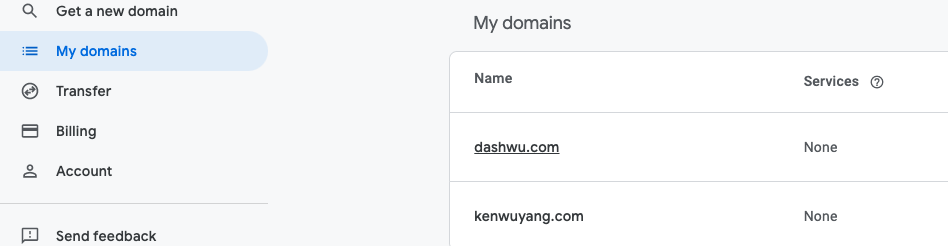
Once purchased, your domain name will appear under My Domains on the left side of the interface. For example, here are my purchased domains:
DNS
The Domain Name System, DNS, is a system that resolves domain names into IP addresses. It converts human-readable domain names (e.g., www.google.com) into Internet Protocol (IP) addresses (e.g., 173.194.39.78). Computers communicate using numbers, so DNS serves as a “phonebook” that translates the domain you enter in your browser into a computer-readable IP.
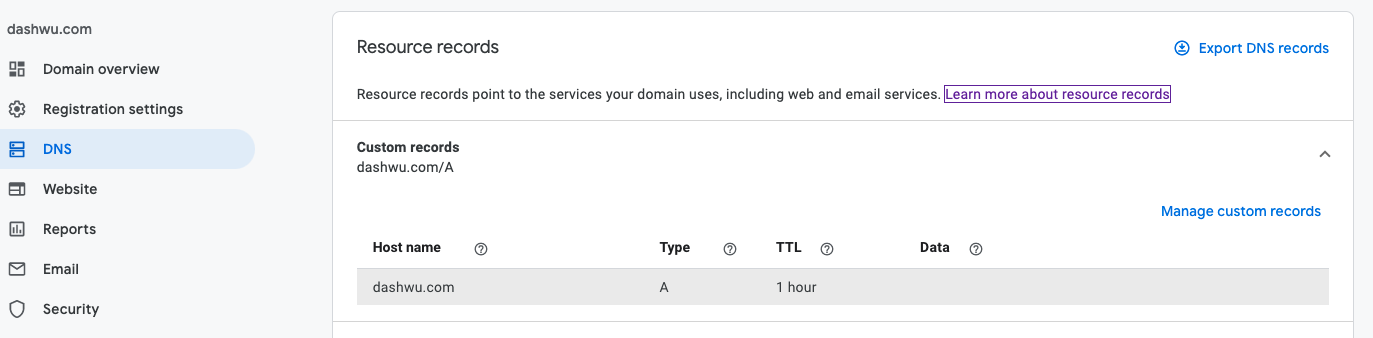
In short, DNS allows you to navigate the web using domain names like google.com instead of memorizing IP addresses like 172.217.3.206. To point your purchased domain name to your application hosted on your EC2 instance, you need to create a resource record via the DNS tab on the left side of the interface:
This setup is nearly identical across domain registrars. Here’s how to configure it:
Host name: This field specifies the domain, subdomain, or host. The default value is
@, which represents the domain name you’ve purchased. For instance, if you want your main domain (e.g.,example.com) to point to your AWS server, use@. If you prefer to use a subdomain, enter it here (e.g.,subdomain), andexample.com/subdomainwill point to your AWS server.Type: This specifies the type of record. To point the domain to your application hosted on your EC2 instance at your elastic IP address, use an A (IPv4) or AAAA (IPv6) record. For more on record types, refer to the Google Domains Help Page.
Time-To-Live (TTL): This field controls how often the resource record is updated or discarded locally (default is 1 hour).
Data: This field specifies the information stored in the record. For an A record, this would be your AWS elastic IP address, e.g.,
123.123.123.123.
Configure Nginx
The final step is to add the server_name directive to the nginx configuration file located at /etc/nginx/sites-available/shiny.conf:
$ sudo service nginx stop
$ sudo nano /etc/nginx/sites-available/shiny.conf
Modify the configuration file as follows (replacing your_domain_name with your actual domain name):
server {
    # Listen on port 80
    listen 80;
    # Listen on IPv6 addresses
    listen [::]:80;
    # Specify your domain name
    server_name YOUR-DOMAIN-NAME;
    # Reverse proxy settings
    location / {
        proxy_pass http://127.0.0.1:3838/;
        proxy_redirect http://127.0.0.1:3838/ $scheme://$host/;
        proxy_http_version 1.1;
        proxy_set_header Upgrade $http_upgrade;
        proxy_set_header Connection $connection_upgrade;
        proxy_read_timeout 120s;
        proxy_buffering on;
    }
}
For more details on the server_name directive, refer to the nginx documentation.
# Restart Nginx
$ sudo service nginx start
Step 8 (Recommended): Secure With HTTPS
When you access your application, you might notice a flag in your web browser indicating that the connection is not secure:
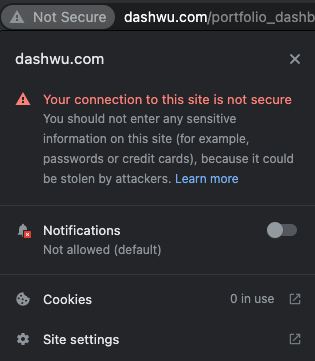
This occurs because some browsers, like Chrome, flag HTTP websites as “Not Secure” in the URL bar. This is part of an effort to encourage web developers to switch to HTTPS, the secure version of HTTP. HTTPS is the primary protocol used to securely transfer data between a web browser and a website. While HTTP is foundational to the internet, the data transferred over it is not encrypted, making it vulnerable to security risks such as Man-in-the-Middle attacks. HTTPS, on the other hand, encrypts traffic, so even if data is intercepted, it appears as unreadable characters.
Switching to HTTPS is important, especially if you’re concerned about security. HTTPS uses an encryption protocol called Transport Layer Security (TLS). To switch from HTTP to HTTPS, you first need to obtain a TLS/SSL certificate, which is a data file hosted on your website’s server containing the website’s public key and identity, among other information. Typically, these certificates are purchased from a Certificate Authority (CA), but this can be costly. Instead, we’ll obtain a certificate from Let’s Encrypt, a free certificate authority that provides digital certificates to anyone who owns a domain name.
Let’s Encrypt With Certbot (SSL Certificate)
To obtain a TLS certificate, we’ll use Certbot, an open-source software that uses Let’s Encrypt certificates to enable HTTPS on websites. Start by visiting the Certbot instructions page to get the most up-to-date installation instructions for your EC2 instance. For the software and system selections, choose “Nginx” for the software and select the appropriate AMI/OS running on your EC2 instance.
Previously, Certbot could be installed from the Certbot Personal Package Archive (PPA). Now, it’s recommended to install snapd. On Ubuntu 20.04.3 LTS (at the time of writing), Snap is pre-installed. Ensure you have the latest version of snapd by running:
$ sudo snap install core; sudo snap refresh coreNext, install Certbot:
$ sudo snap install --classic certbotThis should return a message similar to:
certbot 1.22.0 from Certbot Project (certbot-eff✓) installedCreate a symbolic link between the necessary file paths:
$ sudo ln -s /snap/bin/certbot /usr/bin/certbotCertbot can be run in a way that automatically edits your nginx configuration to serve the certificate. However, we’ll only obtain the certificate, as we prefer to configure nginx ourselves. Use the following command:
$ sudo certbot certonly --nginxFor more information, refer to the Certbot documentation. The program will prompt you for an email address before confirming that you’ve successfully received a certificate:
Successfully received certificate.
Certificate is saved at: /etc/letsencrypt/live/YOUR-DOMAIN-NAME/fullchain.pem
Key is saved at:         /etc/letsencrypt/live/YOUR-DOMAIN-NAME/privkey.pem
This certificate expires on 2022-11-26.
These files will be updated when the certificate renews.
Certbot has set up a scheduled task to automatically renew this certificate in the background.
The Certbot packages on your system include a cron job or systemd timer that will automatically renew your certificates before they expire. To test automatic renewal, run:
$ sudo certbot renew --dry-runYou should see something like this:
- - - - - - - - - - - - - - - - - - - - - - - - - - - - - - - - - - - - - - - -
Processing /etc/letsencrypt/renewal/YOUR-DOMAIN-NAME.conf
- - - - - - - - - - - - - - - - - - - - - - - - - - - - - - - - - - - - - - - -
Account registered.
Simulating renewal of an existing certificate for YOUR-DOMAIN-NAME

- - - - - - - - - - - - - - - - - - - - - - - - - - - - - - - - - - - - - - - -
Congratulations, all simulated renewals succeeded:
  /etc/letsencrypt/live/YOUR-DOMAIN-NAME/fullchain.pem (success)
The certificate and key are stored in the /etc/letsencrypt/live/YOUR-DOMAIN-NAME/ directory:
$ sudo -i
$ cd /etc/letsencrypt/live/YOUR-DOMAIN-NAME/
Configure Nginx
While HTTP uses port 80, HTTPS defaults to port 443. You can see the full list of default port numbers here. At this juncture, your nginx configuration file should look similar to this:
server {
   # Listen on port 80
   listen 80;
   # Listen on IPv6 addresses
   listen [::]:80;
   # Domain name
   server_name YOUR-DOMAIN-NAME;
   # Reverse proxy configuration
   location / {
       proxy_pass http://127.0.0.1:3838/;
       proxy_redirect http://127.0.0.1:3838/ $scheme://$host/;
       proxy_http_version 1.1;
       proxy_set_header Upgrade $http_upgrade;
       proxy_set_header Connection $connection_upgrade;
       proxy_read_timeout 120s;
       proxy_buffering on;
   }
}
Modify the configuration file by adding the http2 parameter to the listen directives:
listen 443 ssl http2;
listen [::]:443 ssl http2;
Add a catch-all HTTP block above the HTTPS server block to redirect all traffic to the HTTPS version of the site:
server {
    listen 80;
    listen [::]:80;

    location / {
        return 301 https://$host$request_uri;
    }
}
The line return 301 https://$host$request_uri redirects all traffic to the corresponding HTTPS server block with status code 301. The $host variable holds the domain name of the request.
You also need to add a large block of configuration settings generated by Mozilla’s SSL/TLS Configuration Generator. Your configuration file should now look something like this:
server {
    listen 80;
    listen [::]:80;

    location / {
        return 301 https://$host$request_uri;
    }
}

server {
    listen 443 ssl http2;
    listen [::]:443 ssl http2;
    server_name YOUR-DOMAIN-NAME;

    location / {
        proxy_pass http://127.0.0.1:3838/;
        proxy_redirect http://127.0.0.1:3838/ $scheme://$host/;
        proxy_http_version 1.1;
        proxy_set_header Upgrade $http_upgrade;
        proxy_set_header Connection $connection_upgrade;
        proxy_read_timeout 120s;
        proxy_buffering on;
    }

    ssl_certificate /etc/letsencrypt/live/YOUR-DOMAIN-NAME/fullchain.pem;
    ssl_certificate_key /etc/letsencrypt/live/YOUR-DOMAIN-NAME/privkey.pem;
    ssl_session_timeout 1d;
    ssl_session_cache shared:MozSSL:10m;  # About 40000 sessions
    ssl_session_tickets off;

    ssl_dhparam /etc/ssl/certs/dhparam.pem;

    # Intermediate configuration
    ssl_protocols TLSv1.2 TLSv1.3;
    ssl_ciphers ECDHE-ECDSA-AES128-GCM-SHA256:ECDHE-RSA-AES128-GCM-SHA256:ECDHE-ECDSA-AES256-GCM-SHA384:ECDHE-RSA-AES256-GCM-SHA384:ECDHE-ECDSA-CHACHA20-POLY1305:ECDHE-RSA-CHACHA20-POLY1305:DHE-RSA-AES128-GCM-SHA256:DHE-RSA-AES256-GCM-SHA384:DHE-RSA-CHACHA20-POLY1305;
    ssl_prefer_server_ciphers off;

    # HSTS (ngx_http_headers_module is required) (63072000 seconds)
    # add_header Strict-Transport-Security "max-age=63072000" always;

    # OCSP stapling
    ssl_stapling on;
    ssl_stapling_verify on;

    # Verify chain of trust of OCSP response using Root CA and Intermediate certs
    ssl_trusted_certificate /etc/letsencrypt/live/YOUR-DOMAIN-NAME/chain.pem;
}
The key placeholders to change after copying the generator’s results are ssl_certificate and ssl_certificate_key:
ssl_certificate /etc/letsencrypt/live/YOUR-DOMAIN-NAME/fullchain.pem;
ssl_certificate_key /etc/letsencrypt/live/YOUR-DOMAIN-NAME/privkey.pem;
For the ssl_dhparam directive, create a dhparam.pem file using the comment provided:
$ sudo -i
$ curl https://ssl-config.mozilla.org/ffdhe2048.txt > /etc/ssl/certs/dhparam.pem
Alternatively, you can use OpenSSL to create the .pem file with 2048 bits:
$ openssl dhparam -out /etc/ssl/dhparam.pem 2048The ssl_trusted_certificate directive specifies a file with trusted CA certificates in PEM format, used to verify client certificates and OCSP responses if SSL stapling is enabled (which it is in our configuration). According to the README file in /etc/letsencrypt/live/YOUR-DOMAIN-NAME, the chain.pem file is used for OCSP stapling, so add the following path to the configuration:
ssl_trusted_certificate /etc/letsencrypt/live/YOUR-DOMAIN-NAME/chain.pem;The HTTP Strict-Transport-Security (HSTS) response header informs browsers that the site should only be accessed using HTTPS, and that any future attempts to access it using HTTP should automatically be converted to HTTPS. Comment out the add_header Strict-Transport-Security "max-age=63072000" always; line for now, and only include it when you are sure everything is working.
Stop nginx and edit the configuration file by copying the above configuration. Note: Replace all placeholders YOUR-DOMAIN-NAME with your actual domain:
$ sudo service nginx stop
$ sudo nano /etc/nginx/sites-available/shiny.conf
$ sudo service nginx startInclude HTTP Strict-Transport-Security
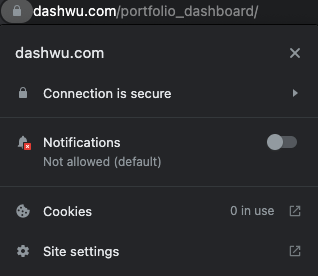
You should see that the connection is now flagged as secure:
You can now include the HTTP Strict-Transport-Security header in the nginx configuration file:
$ sudo service nginx stop
$ sudo nano /etc/nginx/sites-available/shiny.conf
Uncomment the line add_header Strict-Transport-Security "max-age=63072000" always;:
# Restart Nginx
$ sudo service nginx start
Step 9 (Optional): Simple Authentication
Sometimes, you may need to password-protect your application. For this, we’ll use nginx’s ngx_http_auth_basic_module, which allows you to restrict access to resources by validating usernames and passwords using the “HTTP Basic Authentication” protocol.
Configure Nginx
To configure the nginx configuration file located at /etc/nginx/sites-available/shiny.conf to use the ngx_http_auth_basic_module, follow these steps. If you haven’t set up a domain name or switched to HTTPS, your configuration file might look different, but the steps should be similar. You’ll need to add a location block inside your server block.
First, stop nginx and open the configuration file:
$ sudo service nginx stop
$ sudo nano /etc/nginx/sites-available/shiny.conf
Add the following directives to the existing location block with the shortest prefix /:
location / {
    proxy_pass http://127.0.0.1:3838/;
    proxy_redirect http://127.0.0.1:3838/ $scheme://$host/;
    proxy_http_version 1.1;
    proxy_set_header Upgrade $http_upgrade;
    proxy_set_header Connection $connection_upgrade;
    proxy_read_timeout 120s;
    proxy_buffering on;
    auth_basic "Username and Password are required";
    auth_basic_user_file /etc/nginx/.htpasswd;
}
More details on nginx location blocks can be found in the Serving Static Content section of the nginx beginner’s guide. For additional information on nginx server and location block selection algorithms, see this DigitalOcean article.
Your configuration file should now look like this:
server {
    listen 80;
    listen [::]:80;

    location / {
        return 301 https://$host$request_uri;
    }
}

server {
    listen 443 ssl http2;
    listen [::]:443 ssl http2;
    server_name YOUR-DOMAIN-NAME;

    location / {
        proxy_pass http://127.0.0.1:3838/;
        proxy_redirect http://127.0.0.1:3838/ $scheme://$host/;
        proxy_http_version 1.1;
        proxy_set_header Upgrade $http_upgrade;
        proxy_set_header Connection $connection_upgrade;
        proxy_read_timeout 120s;
        proxy_buffering on;
        auth_basic "Username and Password are required";
        auth_basic_user_file /etc/nginx/.htpasswd;
    }

    ssl_certificate /etc/letsencrypt/live/YOUR-DOMAIN-NAME/fullchain.pem;
    ssl_certificate_key /etc/letsencrypt/live/YOUR-DOMAIN-NAME/privkey.pem;
    ssl_session_timeout 1d;
    ssl_session_cache shared:MozSSL:10m;  # About 40000 sessions
    ssl_session_tickets off;

    ssl_dhparam /etc/ssl/certs/dhparam.pem;

    # Intermediate configuration
    ssl_protocols TLSv1.2 TLSv1.3;
    ssl_ciphers ECDHE-ECDSA-AES128-GCM-SHA256:ECDHE-RSA-AES128-GCM-SHA256:ECDHE-ECDSA-AES256-GCM-SHA384:ECDHE-RSA-AES256-GCM-SHA384:ECDHE-ECDSA-CHACHA20-POLY1305:ECDHE-RSA-CHACHA20-POLY1305:DHE-RSA-AES128-GCM-SHA256:DHE-RSA-AES256-GCM-SHA384:DHE-RSA-CHACHA20-POLY1305;
    ssl_prefer_server_ciphers off;

    # HSTS (ngx_http_headers_module is required) (63072000 seconds)
    add_header Strict-Transport-Security "max-age=63072000" always;

    # OCSP stapling
    ssl_stapling on;
    ssl_stapling_verify on;

    # Verify chain of trust of OCSP response using Root CA and Intermediate certs
    ssl_trusted_certificate /etc/letsencrypt/live/YOUR-DOMAIN-NAME/chain.pem;
}
If you navigate to your elastic IP address, your application should now be password-protected:
$ sudo service nginx start
User Login
The final step is to create username-password pairs to control access to your application hosted on your EC2 instance. We can do this using apache2-utils (for Debian/Ubuntu) or httpd-tools (for RHEL/CentOS/Oracle Linux). If you followed the earlier section on upgrading and installing system packages, you should already have apache2-utils installed. To verify:
$ dpkg --list | grep apache2-utils
# If not installed, run:
$ sudo apt-get -y install apache2-utils
To create a password file and the first user, use the htpasswd utility with the -c flag (which stands for “create a new file”). The pathname is the first argument and the username is the second argument:
$ sudo htpasswd -c /etc/nginx/.htpasswd user1You will be prompted to enter a password for user1.
To create additional username-password pairs, do not use the -c flag, as the file already exists:
$ sudo htpasswd /etc/nginx/.htpasswd user2To list all entries in the file containing paired usernames and hashed passwords, run:
$ cat /etc/nginx/.htpasswdTo remove a user, delete their entry using the -D flag:
$ sudo htpasswd -D /etc/nginx/.htpasswd user2To change the password for an existing user:
# Change password for user2
$ sudo htpasswd /etc/nginx/.htpasswd user2
For additional command-line arguments and details, refer to the htpasswd manual page.
Resources
The hyperlinks embedded throughout this post are fairly useful in building an understanding of the deployment process. Additionally, the following resources have been particularly useful: